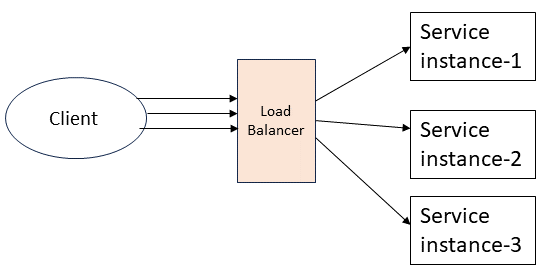
In this post you'll see how to build a microservice application that uses client-side load balancing using Spring Cloud LoadBalancer.
In inter-service communication if there are lots of requests targeted towards a specific service, it is better to scale the service and load balance the requests (distribute the requests) among the different instances of the service. That makes the system more robust and fault tolerant.
Client-side load balancing Vs Server-side load balancing
With client-side load balancing, logic of load balancing is with the client itself. Client can get the list of server instances with the help of discovery and registration sever like Eureka or using ServiceInstanceListSupplier. Client can decide to which instance a particular request can be routed using the client-side load balancer library. Note that Spring cloud load balancer uses round-robin load balancing by default which chooses each instance (out of the registered instances) turn by turn.
With server-side load balancing, server instances are registered with one centralized load balancer. All the incoming requests are initially routed to this load balancer which then determines to which instance a particular request must be sent.
Spring Boot microservice - load balancing with Eureka
In this microservice load balancing example we'll use the example shown in this post- Spring Boot Microservice - Service Registration and Discovery With Eureka as our base example and make changes in it to make it a load balanced service. In fact, most of the things are already in place if you follow that example.
In the example we'll have two services CustomerService and AccountService to cater to customer and account related functionality respectively. When customer information is retrieved it should also get the accounts associated with the specific customer. For getting the associated accounts for a customer we'll have to make a call from CustomerService to AccountService. That's where we'll use load balancing to call one of the AccountService instance.
Add Maven dependency for load balancer
You need to add spring-cloud-loadbalancer in order to create a load balanced client. If you have already
added spring-cloud-starter-netflix-eureka-client dependency then you should already have
spring-cloud-loadbalancer added as it is one of the compiled dependencies of eureka client.
<dependency>
    <groupId>org.springframework.cloud</groupId>
    <artifactId>spring-cloud-loadbalancer</artifactId>
    <version>4.0.4</version>
</dependency>
Using the @LoadBalanced Annotation
Whether you are using RestTemplate or WebClient just annotate it with @LoadBalanced. Then all the requests that pass through this RestTemplate or WebClient instance will automatically be load balanced for your services.
WebClient.builder configuration
import org.springframework.cloud.client.loadbalancer.LoadBalanced;
import org.springframework.context.annotation.Bean;
import org.springframework.context.annotation.Configuration;
import org.springframework.web.reactive.function.client.WebClient;

@Configuration
public class WebClientConfig {

	@Bean
	@LoadBalanced
	WebClient.Builder loadBalancedWebClientBuilder(){
		return WebClient.builder();
	}
}
RestTemplate configuration
import org.springframework.cloud.client.loadbalancer.LoadBalanced;
import org.springframework.context.annotation.Bean;
import org.springframework.context.annotation.Configuration;
import org.springframework.web.client.RestTemplate;

@Configuration
public class TemplateConfig {

  @Bean
  @LoadBalanced
  RestTemplate restTemplate() {
    return new RestTemplate();
  }
}
Want to know how to use Spring Load Balancer with FeignClient, check this post- Spring Boot Microservice - Eureka + LoadBalancer + Feign
Create instances of Account Service
To check whether requests are actually getting distributed among the instances or not, we'll create two or more instances of AccountService as this is the service which is called from CustomerService.
Easy way to create instances for testing is to just change port number in the properties file (yaml file). Once an instance is started just go to application.yaml and change the port number from 8082 to 8083 and start the application again. That will create one more instance of AccountService.
You can check the same in Eureka server.
Once all the services are started access http://localhost:8081/customer/1 where internally a call is made to account-service from customer-service using WebClient or RestTemplate.
Try to access the same URL atleast 3-4 times to check whether load balancing client is working or not. By checking the logs, you can verify that calls to AccountService are getting divided between the service running on port 8082 and the service running on port 8083.
2023-09-28T11:01:47.086+05:30  INFO 24748 --- [           main] o.s.c.n.e.s.EurekaServiceRegistry        : Registering application ACCOUNT-SERVICE with eureka with status UP
2023-09-28T11:01:47.086+05:30  INFO 24748 --- [           main] com.netflix.discovery.DiscoveryClient    : Saw local status change event StatusChangeEvent [timestamp=1695879107086, current=UP, previous=STARTING]
2023-09-28T11:01:47.088+05:30  INFO 24748 --- [nfoReplicator-0] com.netflix.discovery.DiscoveryClient    : DiscoveryClient_ACCOUNT-SERVICE/LAPTOP-VID5S2ND:account-service:8082: registering service...
2023-09-28T11:01:47.121+05:30  INFO 24748 --- [           main] o.s.b.w.embedded.tomcat.TomcatWebServer  : Tomcat started on port(s): 8082 (http) with context path ''
2023-09-28T11:01:47.122+05:30  INFO 24748 --- [           main] .s.c.n.e.s.EurekaAutoServiceRegistration : Updating port to 8082
2023-09-28T11:01:47.136+05:30  INFO 24748 --- [nfoReplicator-0] com.netflix.discovery.DiscoveryClient    : DiscoveryClient_ACCOUNT-SERVICE/LAPTOP-VID5S2ND:account-service:8082 - registration status: 204
2023-09-28T11:01:47.210+05:30  INFO 24748 --- [           main] c.n.a.AccountServiceApplication          : Started AccountServiceApplication in 5.862 seconds (process running for 6.299)
2023-09-28T11:04:11.457+05:30  INFO 24748 --- [nio-8082-exec-1] o.a.c.c.C.[Tomcat].[localhost].[/]       : Initializing Spring DispatcherServlet 'dispatcherServlet'
2023-09-28T11:04:11.461+05:30  INFO 24748 --- [nio-8082-exec-1] o.s.web.servlet.DispatcherServlet        : Initializing Servlet 'dispatcherServlet'
2023-09-28T11:04:11.461+05:30  INFO 24748 --- [nio-8082-exec-1] o.s.web.servlet.DispatcherServlet        : Completed initialization in 0 ms
id .. 1
id .. 1
2023-09-28T11:02:21.525+05:30  INFO 12184 --- [           main] o.s.c.n.e.s.EurekaServiceRegistry        : Registering application ACCOUNT-SERVICE with eureka with status UP
2023-09-28T11:02:21.526+05:30  INFO 12184 --- [           main] com.netflix.discovery.DiscoveryClient    : Saw local status change event StatusChangeEvent [timestamp=1695879141526, current=UP, previous=STARTING]
2023-09-28T11:02:21.528+05:30  INFO 12184 --- [nfoReplicator-0] com.netflix.discovery.DiscoveryClient    : DiscoveryClient_ACCOUNT-SERVICE/LAPTOP-VID5S2ND:account-service:8083: registering service...
2023-09-28T11:02:21.556+05:30  INFO 12184 --- [           main] o.s.b.w.embedded.tomcat.TomcatWebServer  : Tomcat started on port(s): 8083 (http) with context path ''
2023-09-28T11:02:21.557+05:30  INFO 12184 --- [           main] .s.c.n.e.s.EurekaAutoServiceRegistration : Updating port to 8083
2023-09-28T11:02:21.570+05:30  INFO 12184 --- [nfoReplicator-0] com.netflix.discovery.DiscoveryClient    : DiscoveryClient_ACCOUNT-SERVICE/LAPTOP-VID5S2ND:account-service:8083 - registration status: 204
2023-09-28T11:02:21.646+05:30  INFO 12184 --- [           main] c.n.a.AccountServiceApplication          : Started AccountServiceApplication in 5.819 seconds (process running for 6.269)
2023-09-28T11:04:13.539+05:30  INFO 12184 --- [nio-8083-exec-1] o.a.c.c.C.[Tomcat].[localhost].[/]       : Initializing Spring DispatcherServlet 'dispatcherServlet'
2023-09-28T11:04:13.539+05:30  INFO 12184 --- [nio-8083-exec-1] o.s.web.servlet.DispatcherServlet        : Initializing Servlet 'dispatcherServlet'
2023-09-28T11:04:13.542+05:30  INFO 12184 --- [nio-8083-exec-1] o.s.web.servlet.DispatcherServlet        : Completed initialization in 3 ms
id .. 1
That's all for this topic Spring Boot Microservice - Load-Balancing With Spring Cloud LoadBalancer. If you have any doubt or any suggestions to make please drop a comment. Thanks!
>>>Return to Spring Tutorial Page
Related Topics
You may also like-


No comments:
Post a Comment