Friday, July 29, 2022

Byte Streams in Java IO

Byte streams in Java IO are used to perform input and output of 8-bit bytes.

Java InputStream class

All byte stream classes representing an input stream of bytes descend from InputStream. Classes in java.io package representing byte input stream are-

  • InputStream- java.io.InputStream is an abstract class which is the superclass of all classes representing an input stream of bytes.
  • AudioInputStream- An audio input stream is an input stream with a specified audio format and length. The length is expressed in sample frames, not bytes.
  • ByteArrayInputStream- Used to read from the stream into a byte array buffer.
  • FileInputStream- A FileInputStream obtains input bytes from a file in a file system. FileInputStream is meant for reading streams of raw bytes such as image data.
  • FilterInputStream- A FilterInputStream contains some other input stream, which it uses as its basic source of data, possibly transforming the data along the way or providing additional functionality.
  • BufferedInputStream- This class extends FilterInputStream and adds functionality to buffer to another input stream.
  • DataInputStream- A data input stream lets an application read primitive Java data types from an underlying input stream in a machine-independent way. This class extends FilterInputStream.
  • PushbackInputStream- A PushbackInputStream adds functionality to another input stream, namely the ability to "push back" or "unread" one byte.
  • ObjectInputStream- An ObjectInputStream deserializes primitive data and objects previously written using an ObjectOutputStream. Only objects that support the java.io.Serializable or java.io.Externalizable interface can be read from streams.
  • PipedInputStream- Used to read and write data using two separate threads. A piped input stream should be connected to a piped output stream; the piped input stream then provides whatever data bytes are written to the piped output stream.
  • SequenceInputStream- A SequenceInputStream represents the logical concatenation of other input streams. It starts out with an ordered collection of input streams and reads from the first one until end of file is reached, whereupon it reads from the second one, and so on, until end of file is reached on the last of the contained input streams.

Java OutputStream class

All byte stream classes representing an output stream of bytes descend from OutputStream.

Class in java.io package representing byte output stream are-

  • ByteArrayOutputStream- This class implements an output stream in which the data is written into a byte array.
  • FileOutputStream- A file output stream is an output stream for writing data to a File or to a FileDescriptor.
  • FilterOutputStream- This class is the superclass of all classes that filter output streams.
  • BufferedOutputStream- This class extends FilterOutputStream and provides functionality to buffer output stream.
  • DataOutputStream- A data output stream lets an application write primitive Java data types to an output stream in a portable way. This class extends FilterOutputStream.
  • PrintStream- A PrintStream adds functionality to another output stream, namely the ability to print representations of various data values conveniently. This class extends FilterOutputStream.
  • ObjectOutputStream- An ObjectOutputStream writes primitive data types and graphs of Java objects to an OutputStream. Only objects that support the java.io.Serializable interface can be written to streams.
  • PipedOutputStream- A piped output stream can be connected to a piped input stream to create a communications pipe. The piped output stream is the sending end of the pipe. Typically, data is written to a PipedOutputStream object by one thread and data is read from the connected PipedInputStream by some other thread.

Java byte stream example

In the Java example FileInputStream and FileOutputStream are used to read and then write bytes to a file one byte at a time.

import java.io.FileInputStream;
import java.io.FileOutputStream;
import java.io.IOException;

public class FileByteRW {
  public static void main(String[] args) throws IOException {
    FileInputStream fis = null;
    FileOutputStream fos = null;
    try {
      // Streams
      fis = new FileInputStream("F:\\Temp\\abc.txt");
      fos = new FileOutputStream("F:\\Temp\\write.txt");
      int b;
      while ((b = fis.read()) != -1) {
        fos.write(b);
      }
    } finally {
     // Closing streams
      if (fis != null) {
        fis.close();
      }
      if (fos != null) {
        fos.close();
      }
    }
  }
}

When to use byte streams in Java

Byte streams represent low-level I/O that should not be used for normal read write operations. Byte streams should only be used for the most primitive I/O. For character data it is better to use character streams.

That's all for this topic Byte Streams in Java IO. If you have any doubt or any suggestions to make please drop a comment. Thanks!

>>>Return to Java Advanced Tutorial Page


Related Topics

  1. Java BufferedReader Class With Examples
  2. getPath(), getCanonicalPath() and getAbsolutePath() Methods in Java
  3. How to Read Excel File in Java Using Apache POI
  4. Creating PDF in Java Using iText
  5. How to Read Properties File in Java

You may also like-

  1. Unzip File in Java
  2. Types of JDBC Drivers
  3. JVM Run-Time Data Areas - Java Memory Allocation
  4. Serialization Proxy Pattern in Java
  5. Method Overloading in Java
  6. Access Modifiers in Java - Public, Private, Protected and Default
  7. Spring Job Scheduling Using TaskScheduler And @Scheduled Annotation
  8. Namespace And Variable Scope in Python

Thursday, July 28, 2022

Java BufferedReader Class With Examples

Java BufferedReader class is used to read text from a character-input stream. This class is used as a wrapper around any Reader (FileReader and InputStreamReader) whose read() operations may be costly. BufferedReader as the name suggests buffers characters so as to provide for the efficient reading of characters, arrays, and lines. Without buffering, each invocation of read() or readLine() could cause bytes to be read from the file, converted into characters, and then returned, which can be very inefficient.

Java BufferedReader constructors

  • BufferedReader(Reader in)- Wraps the passed Reader and creates a buffering character-input stream that uses a default-sized input buffer. Default buffer size for BufferedReader is 8192 bytes i.e. 8 KB. For example, creating BufferedReader instance by wrapping an instance of FileReader-
        // Instance of FileReader wrapped in a BufferedReader
        BufferedReader br = new BufferedReader(new FileReader("resources/abc.txt"));
     
  • BufferedReader(Reader in, int sz)- Wraps the passed Reader and creates a buffering character-input stream that uses an input buffer of the specified size.

Java BufferedReader methods

Some of the most used methods in BufferedReader class are as given below-

  • read()- Reads a single character. Returns the character read, as an integer in the range 0 to 65535 (0x00-0xffff), or -1 if the end of the stream has been reached.
  • read(char[] cbuf, int off, int len)- Reads characters into a portion of an array.
  • readLine()- Reads a line of text.
  • ready()- Tells whether this stream is ready to be read.
  • skip(long n)- Skips characters.
  • lines()- Returns a Stream, the elements of which are lines read from this BufferedReader. The Stream is lazily populated, i.e., read only occurs during the terminal stream operation.

Java BufferedReader examples

For using BufferedReader steps are as follows-

  1. Create an instance of BufferedReader wrapped around another Reader.
  2. Using that instance read file.
  3. Close the stream, you should close the resources in finally block or you can use try-with-resources to automatically manage resources.

1. Using read() method of the Java BufferedReader class to read file character by character.

public class BRExample {

 public static void main(String[] args) {
  BufferedReader br = null;
  try{
   // Instance of FileReader wrapped in a BufferedReader
   br = new BufferedReader(new FileReader("F:\\NETJS\\Test\\abc.txt"));
   // Read chars from the file, returns -1 when end of stream is reached
   int i;
   while((i = br.read()) != -1){
    char ch = (char)i;
       System.out.println("char is - " + ch);
   }
  }catch(IOException ioExp){
   System.out.println("Error while reading file " + ioExp.getMessage());
  }finally {
   try {
    // Close the stream
    if(br != null){
     br.close();
    }
   } catch (IOException e) {  
    e.printStackTrace();
   }
  }
 }
}

2. Reading characters into a portion of an array using read(char[] cbuf, int off, int len) method of the Java BufferedReader class. Here off represents Offset at which to start storing characters and len represents maximum number of characters to read.

public class BRExample {

 public static void main(String[] args) {
  try(BufferedReader br = new BufferedReader(new FileReader("F:\\NETJS\\Test\\abc.txt"))){
   // char buffer where characters are read
   char[] chArray = new char[10];
   
   br.read(chArray, 0, chArray.length);
   for(char c : chArray) {
    System.out.println(c);
   }

  }catch(IOException ioExp){
   System.out.println("Error while reading file " + ioExp.getMessage());
  }
 }
}

3. Reading a line of text using readLine() method of the BufferedReader class in Java.

public class BRExample {

 public static void main(String[] args) {
  BufferedReader br = null;
  try{
   String strLine;
   // Instance of FileReader wrapped in a BufferedReader
   br = new BufferedReader(new FileReader("F:\\NETJS\\Test\\abc.txt"));
   // Read lines from the file, returns null when end of stream is reached
   while((strLine = br.readLine()) != null){
    System.out.println("Line is - " + strLine);
   }
  }catch(IOException ioExp){
   System.out.println("Error while reading file " + ioExp.getMessage());
  }finally {
   try {
    // Close the stream
    if(br != null){
     br.close();
    }
   } catch (IOException e) {  
    e.printStackTrace();
   }
  }
 }
}

4. Reading from file after skipping few characters using skip() method of the Java BufferedReader class. Code also checks whether stream is ready or not.

public class BRExample {

 public static void main(String[] args) {
  BufferedReader br = null;
  try{
   String strLine;
   // Instance of FileReader wrapped in a BufferedReader
   br = new BufferedReader(new FileReader("F:\\NETJS\\Test\\abc.txt"));
   if(br.ready()) {
    br.skip(10);
    // Read lines from the file, returns null when end of stream is reached
    while((strLine = br.readLine()) != null){
     System.out.println("Line is - " + strLine);
    }
   }

  }catch(IOException ioExp){
   System.out.println("Error while reading file " + ioExp.getMessage());
  }finally {
   try {
    // Close the stream
    if(br != null){
     br.close();
    }
   } catch (IOException e) {  
    e.printStackTrace();
   }
  }
 }
}

5. Using lines() method of the Java BufferedReader class, which is available Java 8 onward, to get a Stream. Using filter method of the Java Stream API to filter lines which contain the given String and print those lines.

public class BRExample {
  public static void main(String[] args) {
    BufferedReader br = null;
    try{
      // Instance of FileReader wrapped in a BufferedReader
      br = new BufferedReader(new FileReader("F:\\NETJS\\Test\\abc.txt"));
      Stream<String> stream = br.lines();
      stream.filter(line -> line.contains("BufferedReader")).forEach(System.out::println);
    }catch(IOException ioExp){
      System.out.println("Error while reading file " + ioExp.getMessage());
    }finally {
      try {
        // Close the stream
        if(br != null){
            br.close();
        }
      } catch (IOException e) {        
        e.printStackTrace();
      }
    }
  }
}

That's all for this topic Java BufferedReader Class With Examples. If you have any doubt or any suggestions to make please drop a comment. Thanks!

>>>Return to Java Advanced Tutorial Page


Related Topics

  1. getPath(), getCanonicalPath() and getAbsolutePath() Methods in Java
  2. Write to a File in Java
  3. Reading File in Java Using Files.lines And Files.newBufferedReader
  4. How to Read Excel File in Java Using Apache POI
  5. Java Stream API Interview Questions And Answers

You may also like-

  1. Java Program to Delete a Node From Binary Search Tree (BST)
  2. CallableStatement Interface in Java-JDBC
  3. CountDownLatch in Java Concurrency
  4. Java join() Method - Joining Strings
  5. Why no Multiple Inheritance in Java
  6. Dependency Injection in Spring Framework
  7. Spring Web Reactive Framework - Spring WebFlux Tutorial
  8. Global Keyword in Python With Examples

Tuesday, July 26, 2022

Compact Strings in Java

In this post we’ll learn about a new feature Compact Strings in Java, added in Java 9, which adopts a more space-efficient internal representation for strings.

Motivation for Compact Strings in Java

Implementation of Java String class before Java 9 stored characters in a char array, using two bytes for each character - UTF-16 encoding. Since String is one of the most used class, String instances constitute a major component of heap usage. It has been observed that most String objects contain only Latin-1 characters which requires only one byte of storage. So internal storage always as UTF-16 means half of the storage is going unused.

Changes for Compact Strings

In order to make Strings more space efficient Java 9 onward internal representation of the String class has been modified from a UTF-16 char array to a byte array plus an encoding-flag field.

As per the Java Compact String feature, based upon the contents of the string characters are stored either as-

  • ISO-8859-1/Latin-1 (one byte per character), or
  • UTF-16 (two bytes per character)

The encoding-flag field indicates which encoding is used.

In the String class you can see the changes for the same-

Storage from char[] array, before Java 9

/** The value is used for character storage. */
 private final char value[]; 

has been changed to byte[] array

private final byte[] value;

Encoding-flag field is named as coder and is of type byte-

private final byte coder;

coder can have either of these two values-

@Native static final byte LATIN1 = 0;
@Native static final byte UTF16  = 1;

Based on whether the storage is Latin-1 or UTF-16 methods of the String class have different implementations too. In fact even the String class has two variants-

final class StringLatin1

final class StringUTF16

Based on the value of the encoding-flag field (coder) specific implementation is called by the methods of the String class.

public int compareTo(String anotherString) {
  byte v1[] = value;
  byte v2[] = anotherString.value;
  if (coder() == anotherString.coder()) {
    return isLatin1() ? StringLatin1.compareTo(v1, v2)
                        : StringUTF16.compareTo(v1, v2);
  }
  return isLatin1() ? StringLatin1.compareToUTF16(v1, v2)
                    : StringUTF16.compareToLatin1(v1, v2);
}

That's all for this topic Compact Strings in Java. If you have any doubt or any suggestions to make please drop a comment. Thanks!

>>>Return to Java Basics Tutorial Page


Related topics

  1. Java join() Method - Joining Strings
  2. StringBuilder Class in Java With Examples
  3. Java String charAt() Method With Examples
  4. Check String Null or Empty in Java
  5. Find All Permutations of a Given String Java Program

You may also like-

  1. final Keyword in Java With Examples
  2. Race Condition in Java Multi-Threading
  3. Convert Numbers to Words Java Program
  4. Binary Tree Implementation in Java - Insertion, Traversal And Search
  5. Reduction Operations in Java Stream API
  6. Spring MVC Form Example With Bean Validation
  7. Python for Loop With Examples
  8. Data Compression in Hadoop

Monday, July 25, 2022

Matrix Addition Java Program

When you add two matrices addition is done index wise you add the element at (0, 0) in the first matrix with the element at (0, 0) in the second matrix, element at (0, 1) in the first matrix with the element at (0, 1) in the second matrix and so on.

As example– If you are adding two matrices of order 3X3

matrix addition java program

Thus the resultant matrix is-

matrix addition

Also remember these points when adding one matrix with another-

  1. Both of the matrix have to be of same size.
  2. Resultant matrix will also have the same order for the elements. Element at (0, 0) in the first matrix added with (0, 0) of the second matrix becomes the element at index (0, 0) in the resultant matrix too.

Matrix addition Java program

 
import java.util.Scanner;

public class MatrixAddition {
  public static void main(String[] args) {
    int rowM, colM;
    Scanner in = new Scanner(System.in);
    
    System.out.print("Enter Number of Rows and Columns of Matrix : ");
    rowM = in.nextInt();
    colM = in.nextInt();
    
    int M1[][] = new int[rowM][colM];
    int M2[][] = new int[rowM][colM];
    int resMatrix[][] = new int[rowM][colM];
        
    System.out.print("Enter elements of First Matrix : ");
    
    for(int i = 0; i < rowM; i++){
      for(int j = 0; j < colM; j++){
        M1[i][j] = in.nextInt();
      }
    }
    System.out.println("First Matrix : " );
    for(int i = 0; i < rowM; i++){
      for(int j = 0; j < colM; j++){
        System.out.print(" " +M1[i][j]+"\t");
      }
      System.out.println();
    }
        
    System.out.print("Enter elements of Second Matrix : ");    
    for(int i = 0; i < rowM; i++){
      for(int j = 0; j < colM; j++){
        M2[i][j] = in.nextInt();
      }
    }
    System.out.println("Second Matrix : " );
    for(int i = 0; i < rowM; i++){
      for(int j = 0; j < colM; j++){
        System.out.print(" " +M2[i][j] + "\t");
      }
      System.out.println();
    }
        
    // Addition logic 
    for(int i = 0; i < rowM; i++){
      for(int j = 0; j < colM; j++){
        resMatrix[i][j] = M1[i][j] + M2[i][j];
      }
    }
        
    // Printing the result matrix 
    System.out.println("Result Matrix : " );
    for(int i = 0; i < resMatrix.length; i++){
      for(int j = 0; j < colM; j++){
        System.out.print(" " +resMatrix[i][j]+"\t");
      }
      System.out.println();
    }
  }
}

Output

Enter Number of Rows and Columns of Matrix :  3 3

Enter elements of First Matrix : 1 3 4 2 5 6 4 3 2

First Matrix : 
 1  3  4 
 2  5  6 
 4  3  2
 
Enter elements of Second Matrix : 2 7 1 0 4 6 9 8 1

Second Matrix : 
 2  7  1 
 0  4  6 
 9  8  1

Result Matrix : 
 3   10  5 
 2   9   12 
 13  11  3 

That's all for this topic Matrix Addition Java Program. If you have any doubt or any suggestions to make please drop a comment. Thanks!

>>>Return to Java Programs Page


Related Topics

  1. Matrix Multiplication Java Program
  2. Array in Java
  3. Remove Duplicate Elements From an Array in Java
  4. Find Largest and Second Largest Number in Given Array Java Program
  5. Swap or Exchange Two Numbers Without Using Any Temporary Variable Java Program

You may also like-

  1. Java Program to Display Prime Numbers
  2. Factorial program in Java
  3. Count Number of Times Each Character Appears in a String Java Program
  4. Encapsulation in Java
  5. Java Variable Types With Examples
  6. How HashMap Works Internally in Java
  7. AtomicInteger in Java With Examples
  8. Dependency Injection in Spring Framework

Tuesday, July 19, 2022

Java Program to Check Prime Number

In this post we'll see a Java program to check whether given number is a prime number or not.

As we know that a number is a prime number if it is a natural number greater than 1 and it can be divided either by 1 or by the number itself. As example- 2, 3, 5, 7, 11, 13, 17 ….

First thing that may come to mind, while writing Java program for checking prime number, is to have a variable in a for loop that starts from 2 (as 1 will always divide the number) and increment it by one until it reaches the number that is checked for being prime number or not. In every iteration of the loop divide the number by variable, if remainder is zero at any time then the checked number is not a prime number.

That loop would look something like this-

for(int i = 2; i < num; i++){
  if(num % i == 0){
    flag = false;
    break;
  }
}

But that logic can be made more efficient. To check if a number is prime or not you need to run a loop starting from 2 till number/2 to check if number has any divisor.

For example, if number is 8 then you just need to check till 4 (8/2) to see if it divides by any number or not. Same way if you have a number 15 you just need to check till 7 to see if it divides completely by any number or not. We'll use the same logic to write our program to check for prime number.

Java program to check prime number or not

import java.util.Scanner;

public class PrimeCheck {
  public static void main(String[] args) {
    // take input from the user
    Scanner sc = new Scanner(System.in);
    System.out.println("Enter number: ");

    int num = sc.nextInt();
    boolean flag = isPrime(num);
    if(flag){
      System.out.println(num + " is a prime number.");
    }else{
      System.out.println(num + " is not a prime number.");
    }
  }
    
  private static boolean isPrime(int num){
    boolean flag = true;
    // loop from 2, increment it till number/2
    for(int i = 2; i <= num/2; i++){
      // no remainder, means divides 
      if(num % i == 0){
        flag = false;
        break;
      }
    }
    return flag;
  }
}

Output

Enter number: 
16
16 is not a prime number.

Enter number: 
31
31 is a prime number.

Here scanner class is used to get input from the user.

Refer How to Read Input From Console in Java to see other ways to get input from user.

That's all for this topic Java Program to Check Prime Number. If you have any doubt or any suggestions to make please drop a comment. Thanks!


Related Topics

  1. Java Program to Display Prime Numbers
  2. How to Display Pyramid Patterns in Java - Part1
  3. Armstrong Number or Not Java Program
  4. Fibonacci Series Program in Java
  5. Converting int to String in Java

You may also like-

  1. Reading File in Java Using BufferedReader
  2. Count Number of Words in a String Java Program
  3. Abstraction in Java
  4. Inheritance in Java
  5. static Keyword in Java With Examples
  6. Difference Between ReentrantLock and Synchronized in Java
  7. Dependency Injection in Spring Framework
  8. Difference Between Checked And Unchecked Exceptions in Java

Monday, July 18, 2022

How to Find Common Elements Between Two Arrays Java Program

This post is about writing a Java program to find common elements between two given arrays. It is a common interview question where it is asked with a condition not to use any inbuilt method or any inbuilt data structure like list or set.

Steps for solution

A simple solution to find common elements between two arrays in Java is to loop through one of the array in the outer loop and then traverse through the other array in an inner loop and compare the element of the outer array with all the elements of the inner array. If similar element is found print it and break from the inner loop.

Find common elements between two given arrays of integers

 
public class FindCommonElement {
 public static void main(String[] args) {
  int[] numArray1 = {1, 4, 5};
  int[] numArray2 = {6, 1, 8, 34, 5};
  // Outer loop
  for(int i = 0; i < numArray1.length; i++){
   for(int j = 0; j < numArray2.length; j++){// inner loop
    if(numArray1[i] == numArray2[j]){
     System.out.println(numArray1[i]);
     break;
    }
   }
  }  
 }
}

Output

 
1
5

Find common elements between two arrays of strings

Logic to find common elements between two arrays remains same in case of array of Strings. Only thing that changes is how you compare, with Strings you will have to use .equals method.

 
public class FindCommonElement {
 public static void main(String[] args) {
  String[] numArray1 = {"Java", "Scala", "Python"};
  String[] numArray2 = {".Net", "Scala", "Clojure", "Java", 
    "Java Script", "Python"};
  // Outer loop
  for(int i = 0; i < numArray1.length; i++){
   for(int j = 0; j < numArray2.length; j++){// inner loop
    if(numArray1[i].equals(numArray2[j])){
     System.out.println(numArray1[i]);
     break;
    }
   }
  }
 }
}

Output

 
Java
Scala
Python

That's all for this topic How to Find Common Elements Between Two Arrays Java Program. If you have any doubt or any suggestions to make please drop a comment. Thanks!

>>>Return to Java Programs Page


Related Topics

  1. Remove Duplicate Elements From an Array in Java
  2. How to Remove Elements From an Array Java Program
  3. Array in Java
  4. Matrix Addition Java Program
  5. If Given String Sub-Sequence of Another String in Java

You may also like-

  1. Convert String to Byte Array Java Program
  2. Count Number of Times Each Character Appears in a String Java Program
  3. Java Lambda Expression Comparator Example
  4. Java Program to Create Your Own BlockingQueue
  5. AtomicInteger in Java With Examples
  6. New Date And Time API in Java With Examples
  7. How HashMap Works Internally in Java
  8. Spring MessageSource Internationalization (i18n) Support

Sunday, July 17, 2022

Type Wrapper Classes in Java

As explained in the post primitive data types in Java there are eight primitive data types and most of the time you will use the primitive types in your code as it reduces the object creation overhead making it more efficient to use primitive types. But there are scenarios when you would want to use objects in place of primitives for that Java platform provides wrapper classes for each of the 8 primitive data types. These classes "wrap" the primitive in an object thus the name wrapper classes. Note that all the wrapper classes in Java are immutable.

Java Wrapper Classes

Eight wrapper classes used to wrap primitive data types are as given below-

Primitive TypeType Wrapper class
booleanBoolean
charCharacter
byteByte
shortShort
intInteger
longLong
floatFloat
doubleDouble

Note that 6 of these are numeric and numeric wrapper classes are subclasses of the abstract class Number class in Java:

Wrapper classes in Java

When do we need wrapper classes in Java

You need to use wrapper classes when you want an object holding primitive data, some of the scenarios where you will need wrapper classes are–

  1. You want to add primitive value in an Object[] array.
  2. You want to add primitive type to any collection like ArrayList, HashMap as you can add only objects to collection classes.
  3. You want to use any of the utility function provided by the wrapper classes for converting values to and from other primitive types, for converting to and from strings, and for converting between number systems (decimal, octal, hexadecimal, binary).

Java Wrapper classes examples

  1. If you want to convert int to a float number.

    In Integer class there is a floatValue() method that can be used for the purpose.

    int num = 25;
    Integer i = new Integer(num);
    float fNum = i.floatValue();
    System.out.println("float Value " + fNum);
  2. If you want to convert double value to a string.
    double d = 25.67;
    String str = Double.toString(d);
    System.out.println("string " + str);
    
  3. If you want to know the min and max range of any type, like for integer
    System.out.println("Integer min value " + Integer.MIN_VALUE);
    System.out.println("Integer max value " + Integer.MAX_VALUE);
    

    Output

    Integer min value -2147483648
    Integer max value 2147483647
    

    For double

    System.out.println("Double min value " + Double.MIN_VALUE);
    System.out.println("Double max value " + Double.MAX_VALUE);
    

    Output

    Double min value 4.9E-324
    Double max value 1.7976931348623157E308
    

Autoboxing and unboxing

Here autoboxing and unboxing in Java should get an honorable mention; autoboxing and unboxing feature was added in Java 5 and it converts primitive into object and object into primitive automatically. In many cases now you don’t need to convert using utility methods as it will happen automatically.

As example you can directly assign int value to an Integer object–

Integer i = 25;

Now conversion and method call (valueOf()) in this case will be done by compiler.

Equivalent code if you were converting yourself–
int num = 25;
Integer i = Integer.valueOf(num);

That's all for this topic Type Wrapper Classes in Java. If you have any doubt or any suggestions to make please drop a comment. Thanks!

>>>Return to Java Basics Tutorial Page


Related Topics

  1. Primitive Data Types in Java
  2. Object Creation Using new Operator in Java
  3. Access Modifiers in Java - Public, Private, Protected and Default
  4. Convert String to float in Java
  5. Convert int to String in Java

You may also like-

  1. Type Casting in Java With Conversion Examples
  2. static Reference to The Non-static Method or Field Error
  3. Constructor Overloading in Java
  4. Java Exception Handling And Method Overriding
  5. How HashMap Works Internally in Java
  6. Fail-Fast Vs Fail-Safe Iterator in Java
  7. Factorial Program in Java
  8. Spring Web Reactive Framework - Spring WebFlux Tutorial

Saturday, July 16, 2022

Unmodifiable or Immutable Map in Java

An unmodifiable Map in Java is one whose keys and values cannot be added, removed, or updated once the unmodifiable instance of a Map is created. In this post we’ll see how Unmodifiable Map was created before Java 9 and how it can be created Java 9 onward using Immutable Map Static Factory Methods.


Creating Unmodifiable Map before Java 9

Till Java 8 in order to create unmodifiable Map Collections.unmodifiableMap() method was used.

Collections.unmodifiableMap(Map<? extends K,? extends V> m)- Returns an unmodifiable view of the specified map. Attempt to modify the returned map, whether direct or via its collection views, result in an UnsupportedOperationException.

Drawback of this method is that the underlying Map is still modifiable let’s try to see it with an example.

public class UnmodifiableMap {
  public static void main(String[] args) {
    Map<String, String> alphaMap = new HashMap<String, String>();
    alphaMap.put("1", "a");
    alphaMap.put("2", "b");
    alphaMap.put("3", "c");
    alphaMap.put("4", "d");
    Map<String, String> aMap = Collections.unmodifiableMap(alphaMap);
    // still mutable
    alphaMap.put("5", "e");
    System.out.println("alphaMap- " + alphaMap);
    //error as this Map is an unmodifiable view
    aMap.put("6", "f");
  }
}

Output

alphaMap- {1=a, 2=b, 3=c, 4=d, 5=e}
Exception in thread "main" 
java.lang.UnsupportedOperationException
 at java.base/java.util.Collections$UnmodifiableMap.put(Collections.java:1455)
 at org.netjs.Programs.UnmodifiableMap.main(UnmodifiableMap.java:20)

As you can see original map alphaMap can still be modified, though the unmodifiable Map view can’t be modified.

Creating Unmodifiable Map in Java 9

The Map.of (Java 9), Map.ofEntries (Java 9), and Map.copyOf (Java 10) static factory methods provide a convenient way to create unmodifiable maps. The Map instances created by these methods have the following characteristics:

  1. They are unmodifiable. Keys and values cannot be added, removed, or updated. Calling any mutator method results in UnsupportedOperationException to be thrown. However, if the contained keys or values are themselves mutable, this may cause the Map to behave inconsistently or its contents to appear to change.
  2. Immutable maps don't allow null keys and values. Attempts to create them with null keys or values result in NullPointerException.
  3. Duplicate keys are rejected at creation time itslef. Passing duplicate keys to a static factory method result in IllegalArgumentException.
  4. Immutable maps are serializable if all keys and values are serializable.
  5. The iteration order of mappings is unspecified and is subject to change.

Java Map.of() methods for creating unmodifiable Map

Map.of() static factory method is a convenient way to create unmodifiable maps Java 9 onward. This method is overloaded to have up to 10 elements and the form of the method is as follows.

Map.of()- Returns an unmodifiable map containing zero mappings. 
Map.of(K k1, V v1)- Returns an unmodifiable map containing a single mapping.
..
..
Map.of(K k1, V v1, K k2, V v2, K k3, V v3, K k4, V v4, K k5, V v5, K k6, V v6, K k7, V v7, K k8, V v8, K k9, V v9)- Returns an unmodifiable map containing nine mappings. 
Map.of(K k1, V v1, K k2, V v2, K k3, V v3, K k4, V v4, K k5, V v5, K k6, V v6, K k7, V v7, K k8, V v8, K k9, V v9, K k10, V v10)- Returns an unmodifiable map containing ten mappings.

Map.of() method Java example

public class UnmodifiableMap {
  public static void main(String[] args) {
    Map<String, String> alphaMap = Map.of("1","a", "2","b", "3","c", "4","d");
    System.out.println("alphaMap- " + alphaMap);
    // Error
    alphaMap.put("5", "e");
  }
}

Output

alphaMap- {2=b, 1=a, 4=d, 3=c}
Exception in thread "main" java.lang.UnsupportedOperationException
 at java.base/java.util.ImmutableCollections.uoe(ImmutableCollections.java:72)
 at java.base/java.util.ImmutableCollections$AbstractImmutableMap.put(ImmutableCollections.java:731)
 at org.netjs.Programs.UnmodifiableMap.main(UnmodifiableMap.java:13)

As you can see trying to modify the immutable Map results in UnsupportedOperationException.

Java Map.ofEntries() method for creating unmodifiable Map

  • Map.ofEntries(Map.Entry<? extends K,? extends V>... entries)- Returns an unmodifiable map containing keys and values extracted from the given entries. The entries themselves are not stored in the map.
import java.util.Map;
import static java.util.Map.entry;

public class UnmodifiableMap {
  public static void main(String[] args) {
    Map<String, String> alphaMap = Map.ofEntries(entry("1", "a"), entry("2", "b"),
                     entry("3", "c"), entry("4", "d"));
    System.out.println("alphaMap- " + alphaMap);
  }
}

Output

alphaMap- {3=c, 2=b, 1=a, 4=d}

Map.copyOf() method in Java

If you want to create an unmodifiable Map using an existing collection then you can use copyOf() method.

  • Map.copyOf(Map<? extends K,? extends V> map)- Returns an unmodifiable Map containing the entries of the given Map. The given Map must not be null, and it must not contain any null keys or values. If the given Map is subsequently modified, the returned Map will not reflect such modifications.
public class UnmodifiableMap {
  public static void main(String[] args) {
    Map<String, String> alphaMap = new HashMap<String, String>();
    alphaMap.put("1", "a");
    alphaMap.put("2", "b");
    alphaMap.put("3", "c");
    alphaMap.put("4", "d");
    Map<String, String> aMap = Map.copyOf(alphaMap);
    System.out.println(" aMap- " + aMap);
  }
}

Output

 aMap- {1=a, 4=d, 3=c, 2=b}

That's all for this topic Unmodifiable or Immutable Map in Java. If you have any doubt or any suggestions to make please drop a comment. Thanks!


Related Topics

  1. How to Loop Through a Map in Java
  2. Unmodifiable or Immutable Set in Java
  3. Difference Between HashMap And ConcurrentHashMap in Java
  4. TreeMap in Java With Examples
  5. Difference Between ArrayList And LinkedList in Java

You may also like-

  1. ConcurrentSkipListMap in Java With Examples
  2. Java ReentrantLock With Examples
  3. Java Lambda Expression And Variable Scope
  4. Map Operation in Java Stream API
  5. Java Abstract Class and Abstract Method
  6. Java Program to Convert a File to Byte Array
  7. Autowiring in Spring Using @Autowired and @Inject Annotations
  8. Python count() method - Counting Substrings

Wednesday, July 6, 2022

String Pool in Java

String in Java is one of the most used class so there are certain optimizations done to make Strings more efficient, one of that optimization is String pool in Java which reduces the memory usage of the String objects. Use of the string pool is possible because of another design decision; making String immutable in Java.

Java String pool

As the name itself suggests String pool is a pooling of String objects. So, the question is on what basis Strings are pooled and how does it reduces memory usage?

In more technical term it can be explained as when JVM sees a String literal it interns the created String object i.e. stores it in a pool that has only one such copy of that String.

To explain it in detail we’ll have to start from the beginning!

As you must be knowing there are two ways to create a String in Java–

  • Using String literal
  • Using new keyword
When you create a String using String literal, for example-
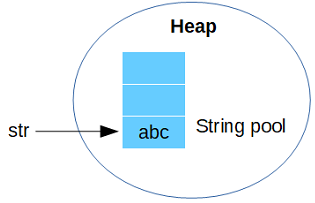
String str = “abc”

Memory allocation for this string object happens in an area knows as string pool in Java which is part of the heap memory.

Java String pool

When you create any String literal, JVM searches the String pool for any String having the same value, if such a value is found reference to the same memory is returned. So, new memory is not allocated for the same string rather the reference is shared among the String literals having the same value.

If String with same value is not found in the pool the new value is added to the pool and its reference is returned.

For example, if two Strings are created as follows-

String str1 = “abc”;
String str2 = “abc”;

Then the reference is shared by both the objects.

You can also check it using a Java program by creating two String literal having same value and then compare their references using equality ‘==’ operator, if true is returned that means both have the same reference.

public class StringDemo {

 public static void main(String[] args) {
  String str1 = "abc";
  String str2 = "abc";
  if(str1 == str2){
   System.out.println("str1 and str2 are same");
  }else{
   System.out.println("str1 and str2 are not same");
  }
 }
}

Output

str1 and str2 are same

String created using new operator

Where as when you create a String object using new operator, it always creates a new object in heap memory.

For example, if three Strings are created as follows-

String str1 = “abc”;
String str2 = new String(“abc”);
String str3 = new String(“abc”);

Then str1 is stored in a pool where as new objects are created for str2 and str3.

string interning

Here is a Java example to check the same. If we create two more strings using new operator and then compare reference those references should be different.

public class StringDemo {
 public static void main(String[] args) {
  // Literals
  String str1 = "abc";
  String str2 = "abc";
  if(str1 == str2){
   System.out.println("str1 and str2 are same");
  }else{
   System.out.println("str1 and str2 are not same");
  }
  // Using new operator
  String str3 = new String("abc");
  String str4 = new String("abc");
  if(str3 == str4){
   System.out.println("str3 and str4 are same");
  }else{
   System.out.println("str3 and str4 are not same");
  }
  
  if(str1 == str4){
   System.out.println("str1 and str4 are same");
  }else{
   System.out.println("str1 and str4 are not same");
  }
 }
}

Output

str1 and str2 are same
str3 and str4 are not same
str1 and str4 are not same

Here it can be seen that str3 and str4 are having separate reference as those strings are created using new operator.

Explicitly interning a String

You can explicitly intern a string using intern() method in Java.

As per Java docs- “When the intern method is invoked, if the pool already contains a string equal to this String object as determined by the equals(Object) method, then the string from the pool is returned. Otherwise, this String object is added to the pool and a reference to this String object is returned.”

In the previous example if str4 is changed and uses intern() method then str4 should also return a reference a similar to str1 and str2.

public class StringDemo {

 public static void main(String[] args) {
  String str1 = "abc";
  String str2 = "abc";
  if(str1 == str2){
   System.out.println("str1 and str2 are same");
  }else{
   System.out.println("str1 and str2 are not same");
  }
  String str3 = new String("abc");
  String str4 = new String("abc").intern();
  if(str3 == str4){
   System.out.println("str3 and str4 are same");
  }else{
   System.out.println("str3 and str4 are not same");
  }
  
  if(str1 == str4){
   System.out.println("str1 and str4 are same");
  }else{
   System.out.println("str1 and str4 are not same");
  }
 }
}

Output

str1 and str2 are same
str3 and str4 are not same
str1 and str4 are same

It can be seen that str1 and str4 are having the same reference now.

String pool values are garbage collected

Strings in the Java string pool are eligible for garbage collection if there are no references to them.

That's all for this topic String Pool in Java. If you have any doubt or any suggestions to make please drop a comment. Thanks!

>>>Return to Java Basics Tutorial Page


Related topics

  1. How to Create Immutable Class in Java
  2. Java String Interview Questions And Answers
  3. Java String Search Using indexOf(), lastIndexOf() And contains() Methods
  4. String Vs StringBuffer Vs StringBuilder in Java
  5. Java Program to Find The Longest Palindrome in a Given String

You may also like-

  1. Java for Loop With Examples
  2. Java Abstract Class and Abstract Method
  3. TreeSet in Java With Examples
  4. Thread States (Thread Life Cycle) in Java Multi-Threading
  5. Java Stream API Tutorial
  6. DataSource in Java-JDBC
  7. Spring Web MVC Tutorial
  8. Class And Object in Python

Tuesday, July 5, 2022

Python break Statement With Examples

In this tutorial you’ll learn about break statement in Python which is used inside a for loop or while loop to terminate the loop when break statement is executed. When break statement is encountered inside a loop control comes out of the loop and the next statement after the loop is executed.

Common use of break statement is to use it along with some condition in the loop using if statement. When the condition is true the break statement is executed resulting in termination of the loop.

Break statement when used in nested loops results in the termination of the innermost loop in whose scope it is used.

break statement Python examples

1- Using break statement with for loop in Python. In the example a tuple is iterated using a for loop to search for a specific number as soon as that number is found you need to break out of for loop.

numbers = (89, 102, 0, 234, 67, 10, 333, 32)
flag = False
for num in numbers:
    if num == 10:
        flag = True
        break
if flag:
    print('Number found in tuple')
else:
    print('Number not found in tuple')

Output

Number found in tuple

As you can see here break statement is used inside for loop to break out of loop when the condition is satisfied. Note that searching for an element in a tuple can be done in a more compact way like given below, above example is more of an illustration of break statement.

if searched_num in numbers:
    print('Number found in tuple')
else:
    print('Number not found in tuple')

2- Using break statement in Python with while loop. In the example there is an infinite while loop that is used to prompt user for an input. Condition here is that entered number should be greater than 10 to break out of while loop otherwise prompt user again to enter valid input.

while True:
   num = int(input("Enter a number greater than 10: "))
   # condition for breaking out of loop
   if num > 10:
       break
   print("Please enter a number greater than 10...")

print("Entered number is", num)

Output

Enter a number greater than 10: 7
Please enter a number greater than 10...
Enter a number greater than 10: 11
Entered number is 11

3- In this example we’ll see how to use break statement with nested loops. There are 2 for loops in the example and break statement is used in the scope of inner for loop so it breaks out of that loop when the condition is true.

for i in range(1, 6):
    print(i, "- ", end='')
    for j in range(1, 10):
        print('*', end='')
        # print only 5 times then break
        if j >= 5:
            break
    # move to next line now
    print()

Output

1 - *****
2 - *****
3 - *****
4 - *****
5 - *****

As you can see though the range of inner loop is (1..10) but it breaks out when j’s value is 5 because of the break statement. The end='' used in print statement ensures that the cursor doesn’t move to next line after printing in each iteration.

That's all for this topic Python break Statement With Examples. If you have any doubt or any suggestions to make please drop a comment. Thanks!

>>>Return to Python Tutorial Page


Related Topics

  1. Python continue Statement With Examples
  2. pass Statement in Python
  3. Python assert Statement
  4. Python First Program - Hello World
  5. Python String split() Method

You may also like-

  1. Name Mangling in Python
  2. Inheritance in Python
  3. Class And Object in Python
  4. Python Generator, Generator Expression, Yield Statement
  5. Java Variable Types With Examples
  6. Ternary Operator in Java With Examples
  7. How to Convert Date And Time Between Different Time-Zones in Java
  8. Spring Constructor Based Dependency Injection

Monday, July 4, 2022

continue Statement in Java With Examples

When you are working with loops where loop body is repeatedly executed, you may have a scenario where you want to skip the execution of statements inside the loop or you may want to terminate the loop altogether. To handle these two scenarios there are two control statements in Java- continue statement and break statement. In this tutorial you’ll learn about Java continue statement along with usage examples.

When to use continue statement in Java

During the repeated execution of the loop if you don’t want to execute statements with in the loop body for some particular condition you can force the next iteration of the loop using continue statement.

If there is a continue statement in a loop statements after the continue are not executed and control jumps to the beginning of the loop.

If continue statement is there in while loop or do-while loop control transfers to the condition of the loop.

In case of for loop, continue statement causes the control to transfer to the iteration part first and then to condition part.

Continue statement Java examples

1- Using continue statement with while loop. In the example you want the user to enter an even number when such a number is entered then only control comes out of the loop otherwise loop continues.

public class ContinueJava {

  public static void main(String[] args) {
    Scanner scanner = new Scanner(System.in);
    int number;
    while(true){
      System.out.print("Enter a number: ");
      number = scanner.nextInt();
      // checking entered number even or not
      if(number%2 != 0) {
        System.out.println("Please enter even number...");
        continue;
      }else {
        break;
      }
    }
    scanner.close();
    System.out.print("Entered number is- " + number);
  }
}

Output

Enter a number: 5
Please enter even number...
Enter a number: 7
Please enter even number...
Enter a number: 8
Entered number is- 8

2- Using continue statement in for loop.

public class ContinueJava {
  public static void main(String[] args) {
    for(int i = 0; i < 5; i++) {
      if (i == 1)
        continue;
      System.out.println(i);
    }
  }
}

Output

0
2
3
4

As you can see when value of i is 1 continue statement is encountered so the statement after the continue statement is not executed and the control transfers to the beginning of the loop for next iteration.

3- Using continue statement in do-while loop. In the example odd numbers between 1..10 are displayed using do-while loop.

public class ContinueJava {
  public static void main(String[] args) {
    int i = 1;
    do {
      // check if even number
      if(i%2 == 0)
        continue;
      System.out.println(i);
    }while(++i < 10);
  }
}

Output

1
3
5
7
9

Labelled continue statement in Java

Just like labeled break statement there is also a labeled continue statement to let you decide which loop to continue.

Labelled continue statement Java example

In the example a pattern (triangle) is displayed using labeled continue statement.

public class ContinueJava {
  public static void main(String[] args) {
    outer:
    for (int i = 0; i < 6; i++) {
      for(int j = 0; j < 6; j++) {
        if(j > i) {
          System.out.println();
          continue outer;
        }
        System.out.print("*");
      }
    }
  }
}

Output

*
**
***
****
*****
******

In the example whenever value of j is greater than i control is transferred to the outer for loop for next iteration.

That's all for this topic continue Statement in Java With Examples. If you have any doubt or any suggestions to make please drop a comment. Thanks!

>>>Return to Java Basics Tutorial Page


Related Topics

  1. Switch-Case Statement in Java With Examples
  2. Java Variable Types With Examples
  3. super Keyword in Java With Examples
  4. Access Modifiers in Java - Public, Private, Protected and Default
  5. Java Abstract Class and Abstract Method

You may also like-

  1. Java String Search Using indexOf(), lastIndexOf() And contains() Methods
  2. Method Overloading in Java
  3. Linear Search (Sequential Search) Java Program
  4. Bubble Sort Program in Java
  5. HashMap in Java With Examples
  6. Difference Between Thread And Process in Java
  7. pass Statement in Python
  8. Spring Component Scan Example

Sunday, July 3, 2022

Arrange Non-Negative Integers to Form Largest Number - Java Program

In this post, we’ll see Java code to solve the stated problem “Given a list of non-negative integers arrange them to form the largest number”.

As example– If list of numbers is [2, 35, 23, 6, 8] then the Java program should output the largest number as 8635232.

If list of non-negative integers is [7, 70] then the largest number should be 770.

Logic for the Solution

Logic for Java program to form the biggest number by arranging the given list of numbers is as follows-

If you compare these integers after converting them to strings and arrange them in decreasing order then you will get the biggest number.

So the question arises why as String? Reason is Strings are compared in lexicographic order which means if two strings “Always” and “Be” are compared then only by comparing first character it is determined that “Be” will be placed first (if order is decreasing order).

Same way for Strings “6” and “53”, string “6” will be placed first (if order is decreasing order) because comparing first character itself determines that order. In String comparison it won’t go by the value. So you can see how it helps as you get the largest number 653 by this comparison.

Another thing is you will have to write your own comparator to have a decreasing order since sorting is done in natural order by default.

Java program to arrange integers to form largest number

import java.util.Arrays;
import java.util.Collections;
import java.util.Comparator;
import java.util.List;

public class LargestNum {

 public static void main(String[] args) {
  List<Integer> numList = Arrays.asList(2, 35, 23, 6, 8);
  
  formLargestNum(numList);   
 }
 
 /**
  * Method used to form the largest number using the 
  * numbers passed in the list
  * @param numList
  */
 private static void formLargestNum(List<Integer> numList){
  Collections.sort(numList, new Comparator<Integer>() {

   @Override
   public int compare(Integer num1, Integer num2) {
    String a = num1.toString() + num2.toString();
    String b = num2.toString() + num1.toString();
    
    System.out.println("a- " + a);
    System.out.println("b- " + b);
    return b.compareTo(a);
   }
  });
  // Displaying number
  for(Integer i : numList){
   System.out.print(i);
  }
 }
}

Output

8635232

One thing you would have noticed here is the way concatenation of the strings is done

String a = num1.toString() + num2.toString();
String b = num2.toString() + num1.toString();

You may use the single string also like below-

String a = num1.toString();
String b = num2.toString();

It may run fine in most of the cases but it will give problem with Strings like “7” and “70” where it will place 70 before 7. While comparing, since the first character is equal in this case, so comparison of second character will be done which will result in 70 coming before 7 and negate the effect of using String instead of number. By concatenating the two strings you can avoid this problem.

That's all for this topic Arrange Non-Negative Integers to Form Largest Number - Java Program. If you have any doubt or any suggestions to make please drop a comment. Thanks!

>>>Return to Java Programs Page


Related Topics

  1. Armstrong Number or Not Java Program
  2. Java Program to Reverse a Number
  3. Fibonacci Series Program in Java
  4. Print Odd-Even Numbers Using Threads And wait-notify Java Program
  5. Convert double to int in Java

You may also like-

  1. Invoking Getters And Setters Using Reflection in Java
  2. How to Create PDF From XML Using Apache FOP
  3. Unzip File in Java
  4. Read or List All Files in a Folder in Java
  5. Ternary Operator in Java With Examples
  6. Java String Search Using indexOf(), lastIndexOf() And contains() Methods
  7. Volatile Keyword in Java With Examples
  8. Dependency Injection in Spring Framework

Saturday, July 2, 2022

@Conditional Annotation in Spring

In some cases you do want to conditionally enable or disable a complete @Configuration class, or even individual @Bean methods. One common example of this is to use the @Profile annotation to activate beans only when a specific profile has been enabled in the Spring Environment. Another way is using @Conditional annotation in Spring which is the topic of this post.

@Conditional annotation in Spring

In Spring 4 @Conditional annotation has been added which can be used for providing your own logic for conditional checking and then decide whether specific bean should be registered or not.

The @Conditional annotation indicates specific org.springframework.context.annotation.Condition implementations that specifies the condition which should be consulted before a @Bean is registered.

Condition interface in Spring framework

A single condition that must be matched in order for a component to be registered. The class given as value in @Conditional annotation has to implement the Condition interface. Condition interface requires that you provide an implementation of the matches() method.

  • boolean matches(ConditionContext context, AnnotatedTypeMetadata metadata)- Determine if the condition matches.

    Parameters:

    • context- the condition context
    • metadata- metadata of the class or method being checked
    • Returns: true if the condition matches and the component can be registered or false to veto registration.

Spring Conditional annotation example

Suppose you want to create a bean only if a specific condition is present in the property file otherwise you don’t want to create the bean. That conditional creation of bean can be done using @Conditional annotation.

TestBean class

public class TestBean {
 private String name;
 public String getName() {
  return name;
 }

 public void setName(String name) {
  this.name = name;
 } 
}

TestBeanCondition class

This is the class which implements the Condition interface and provides the condition for creating the TestBean. As you can see in the matches method it checks if environment contains the property “test”.

import org.springframework.context.annotation.Condition;
import org.springframework.context.annotation.ConditionContext;
import org.springframework.core.env.Environment;
import org.springframework.core.type.AnnotatedTypeMetadata;

public class TestBeanCondition implements Condition {
 @Override
 public boolean matches(ConditionContext context, AnnotatedTypeMetadata metadata) {
  Environment env = context.getEnvironment();
  return env.containsProperty("test");
 }
}

test.properties class

test=true
country=India

TestBeanConfig class

This is the class where TestBean is created, you can see the @Conditional annotation used here with the class that provides the condition.
 
import org.springframework.context.annotation.Bean;
import org.springframework.context.annotation.Conditional;
import org.springframework.context.annotation.Configuration;
import org.springframework.context.annotation.PropertySource;

@Configuration
@PropertySource(value="classpath:config/test.properties", ignoreResourceNotFound=true)
public class TestBeanConfig {
 @Bean
 @Conditional(TestBeanCondition.class)
 public TestBean testBean() {
  System.out.println("test bean creation");
  return new TestBean();
 }
}

You can test this code using the following piece of code-

 
import org.springframework.context.annotation.AnnotationConfigApplicationContext;
public class AppProfile {
 public static void main( String[] args ){
   AnnotationConfigApplicationContext context = new AnnotationConfigApplicationContext
   (TestBeanConfig.class);
  
   TestBean tb = (TestBean)context.getBean("testBean");  
   tb.setName("Ram");
   System.out.println("" + tb.getName());
   context.close();
 }
}

Output

test bean creation
Ram

That's all for this topic @Conditional Annotation in Spring. If you have any doubt or any suggestions to make please drop a comment. Thanks!

>>>Return to Spring Tutorial Page


Related Topics

  1. Spring Profiles With Examples
  2. Spring JdbcTemplate Insert, Update And Delete Example
  3. Wiring Collections in Spring
  4. How to Inject Null And Empty String Values in Spring
  5. Data access in Spring framework

You may also like-

  1. Dependency Injection in Spring Framework
  2. BeanPostProcessor in Spring Framework
  3. @Required Annotation in Spring Framework
  4. Find All Permutations of a Given String Java Program
  5. How to Remove Duplicate Elements From an ArrayList in Java
  6. Java BlockingQueue With Examples
  7. Is String Thread Safe in Java
  8. Encapsulation in Java

return Statement in Java With Examples

In previous tutorials we have already seen continue statement which is used to continue the iteration of a loop and break statement which is used to break out of a loop, in this post we’ll learn about return statement in Java which is used to explicitly return from a method.

Java return statement

When a return statement is encountered in a method that method’s execution is terminated and control transfers to the calling method. A return statement may or may not return a value to the calling method.

Rules for using Java return statement

  1. If no value is returned from the method then the method signature should signify it by having void in method signature. For example- void methodA()
  2. If a method is not returning any value i.e. its a void method then having return statement in that method is not mandatory. Though an empty return can still be there which can be used as a control statement to terminate execution of the method for given condition.
  3. If a method is returning a value then return type should be signified in the method signature. For example a method that returns int should have it in its method signature- int methodA()
  4. The return type of the method and actual value returned should be compatible.

Java return keyword example

1- A method returning int value.

public class ReturnExample {

 public static void main(String[] args) {
  ReturnExample obj = new ReturnExample();
  int sum = obj.add(6,  7);
  System.out.println("Sum is- " + sum);
 }
 
 int add(int a, int b) {
  int sum = a + b;
  return sum;
 }
}

Output

Sum is- 13

2- A void method with return statement as a control statement to terminate method execution when the condition is satisfied.

public class ReturnExample {
  public static void main(String[] args) {
    ReturnExample obj = new ReturnExample();
    obj.display();
    System.out.println("After method call...");
  }
    
  void display() {
    for(int i = 1; i <= 10; i++) {
      // method execution terminates when this 
      //condition is true
      if (i > 5)
        return;
      System.out.println(i);
    }
  }
}

Output

1
2
3
4
5
After method call...

In the example, there is a for loop in method with a condition to return from the method. When the condition is true, method execution is terminated and the control returns to the calling method.

One point to note here is that in a method return statement should be the last statement or it should be with in a condition. Since method execution terminates as soon as return statement is encountered so having any statements after return results in “Unreachable code” error.

public class ReturnExample {

 public static void main(String[] args) {
  ReturnExample obj = new ReturnExample();
  obj.display();
  System.out.println("After method call...");
 }
 
 void display() {
  int i;
  return;
  i++; // error
 }
}

In the example there is code after the return statement which is never going to be executed thus the “Unreachable code” compile time error.

That's all for this topic return Statement in Java With Examples. If you have any doubt or any suggestions to make please drop a comment. Thanks!

>>>Return to Java Basics Tutorial Page


Related Topics

  1. Java do-while Loop With Examples
  2. Conditional Operators in Java
  3. Why Class Name And File Name Should be Same in Java
  4. Object Creation Using new Operator in Java
  5. Literals in Java

You may also like-

  1. Method Overriding in Java
  2. Interface in Java With Examples
  3. Java String Search Using indexOf(), lastIndexOf() And contains() Methods
  4. try-catch Block in Java Exception Handling
  5. Split a String in Java Example Programs
  6. Java Program to Reverse a Number
  7. Serialization and Deserialization in Java
  8. Nested Class And Inner Class in Java