In this post we’ll see a Spring MVC example which is one step better than hello world Spring web MVC example as we’ll create two views (JSPs) that will give you a better idea about the controller mapping, how Java model bean is bound to a web form and the Spring web MVC flow (request - Servlet – Controller – Model – View). This post is in continuation to the post Spring Web MVC Tutorial which gives an overview of Spring Web MVC.
Note that this Spring MVC example uses XML configuration, for Spring MVC example with Java config refer this post- Spring Web MVC Java Configuration Example
Technologies used
Following is the list of tools used for the Spring web MVC example.
- Spring 5.0.8 Release (Spring core, spring web, spring webmvc).
- Java 10
- Tomcat server V 9.0.10
- Eclipse IDE for Java EE development
Project structure and Maven Dependencies
It’s convenient to use Maven for managing dependencies and building the application so we’ll use Maven in our Spring Web MVC example.
Though you can create a Maven project and choose web archetype for creating a web project but the project structure that creates is a little different. Somehow I like it better to create a “Dynamic Web Project” and later convert it to Maven project.
Creating project structure in Eclipse
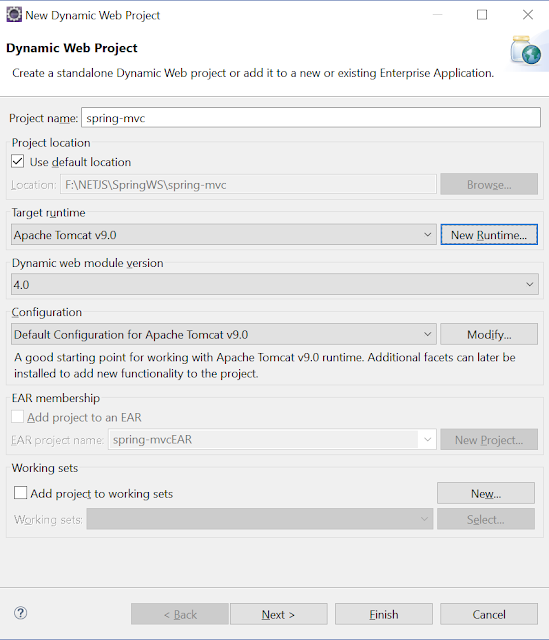
In Eclipse select File – New – Dynamic Web Project.
Enter the project name, in this example name given is spring-mvc. You can also select the target runtime here itself as Apache Tomcat. Keep clicking next in the web module page make sure to check the “Generate web.xml deployment descriptor” check box, so that the web.xml is generated. Click Finish.
Converting to Maven project
Right click on the created web project. Select Configure – Convert to maven project.
In the window “Create new POM” give the name for artifact ID and Group ID. You can keep both as project name. Ensure that the packaging is war. For Name and description you can give “Spring MVC” and “Spring MVC example” respectively.
Adding dependencies to pom.xml
Now you can add dependencies for Spring Web MVC. Refer the pom.xml given below.
<project xmlns="http://maven.apache.org/POM/4.0.0" xmlns:xsi="http://www.w3.org/2001/XMLSchema-instance" xsi:schemaLocation="http://maven.apache.org/POM/4.0.0 http://maven.apache.org/xsd/maven-4.0.0.xsd">
  <modelVersion>4.0.0</modelVersion>
  <groupId>spring-mvc</groupId>
  <artifactId>spring-mvc</artifactId>
  <version>0.0.1-SNAPSHOT</version>
  <packaging>war</packaging>
  <name>Spring MVC</name>
  <description>Spring MVC example</description>
  <properties>
    <spring.version>5.0.8.RELEASE</spring.version>
  </properties>
  <dependencies>
    <dependency>
       <groupId>org.springframework</groupId>
       <artifactId>spring-core</artifactId>
       <version>${spring.version}</version>
    </dependency>
    <dependency>
        <groupId>org.springframework</groupId>
        <artifactId>spring-context</artifactId>
        <version>${spring.version}</version>
    </dependency>
    <dependency>
        <groupId>org.springframework</groupId>
        <artifactId>spring-webmvc</artifactId>
        <version>${spring.version}</version>
    </dependency>
    <dependency>
        <groupId>org.springframework</groupId>
        <artifactId>spring-web</artifactId>
        <version>${spring.version}</version>
    </dependency>
    <!-- For JSTL tags -->
    <dependency>
        <groupId>jstl</groupId>
        <artifactId>jstl</artifactId>
        <version>1.2</version>
    </dependency>
  </dependencies>
  <build>
    <sourceDirectory>src</sourceDirectory>
    <plugins>
      <plugin>
        <artifactId>maven-compiler-plugin</artifactId>
        <version>3.7.0</version>
        <configuration>
          <release>10</release>
        </configuration>
      </plugin>
      <plugin>
        <artifactId>maven-war-plugin</artifactId>
        <version>3.2.1</version>
        <configuration>
          <warSourceDirectory>WebContent</warSourceDirectory>
        </configuration>
      </plugin>
    </plugins>
  </build>
</project>
With that you have the project structure ready for your Spring Web MVC example. Here is an image showing the final project structure for reference.
Spring MVC configuration for DispatcherServlet
In spring MVC all requests go through DispatcherServlet which acts as a front controller. You need to configure DispatcherServlet in web.xml with the Servlet mapping for the URL pattern to indicate the URLs served by the DispatcherServlet.
web.xml
<?xml version="1.0" encoding="UTF-8"?>
<web-app xmlns:xsi="http://www.w3.org/2001/XMLSchema-instance" xmlns="http://xmlns.jcp.org/xml/ns/javaee" xsi:schemaLocation="http://xmlns.jcp.org/xml/ns/javaee http://xmlns.jcp.org/xml/ns/javaee/web-app_4_0.xsd" version="4.0">
  <display-name>spring-mvc</display-name>
  <servlet>
    <servlet-name>mvcexample</servlet-name>
    <servlet-class>org.springframework.web.servlet.DispatcherServlet</servlet-class>
    <load-on-startup>1</load-on-startup>
  </servlet>
  <servlet-mapping>
    <servlet-name>mvcexample</servlet-name>
    <url-pattern>/</url-pattern>
  </servlet-mapping>
</web-app>
Here <servlet-name> is important because DispatcherServlet tries to load the Spring application context from the XML file whose name is <servlet-name>-servlet.xml. For example here name is mvcexample so DispatcherServlet will look for the xml named mvcexample-servlet.xml in WEB-INF directory. So you need to create mvcexample-servlet.xml file now.
Configuration file for Spring Web MVC example (mvcexample-servlet.xml)
<?xml version="1.0" encoding="UTF-8"?>
<beans xmlns="http://www.springframework.org/schema/beans"
    xmlns:mvc="http://www.springframework.org/schema/mvc"
    xmlns:context="http://www.springframework.org/schema/context"
    xmlns:xsi="http://www.w3.org/2001/XMLSchema-instance"
    xsi:schemaLocation="
        http://www.springframework.org/schema/beans
        http://www.springframework.org/schema/beans/spring-beans.xsd
        http://www.springframework.org/schema/mvc
        http://www.springframework.org/schema/mvc/spring-mvc.xsd
        http://www.springframework.org/schema/context
        http://www.springframework.org/schema/context/spring-context.xsd">

  <mvc:annotation-driven />
  <context:component-scan base-package="org.netjs.controller" />
  <bean class=
      "org.springframework.web.servlet.view.InternalResourceViewResolver">
    <property name="prefix" value="/WEB-INF/jsp/" />
    <property name="suffix" value=".jsp" />
  </bean>
</beans>
Here <mvc:annotation-driven/> tag means DefaultAnnotationHandlerMapping is used which maps request to controller and controller methods that are annotated with @RequestMapping.
<context:component-scan> with the base package means the package where framework needs to look for beans with @Controller annotation.
For resolving views InternalResourceViewResolver is used where two properties suffix and prefix are given. By this approach you don’t need to hard code the views but the views are resolved at run time using the configuration. For example if logical view name returned from controller is “home” then the JSP that has to be used as view will be found at the location- /WEB-INF/jsp/home.jsp
Spring Web MVC example classes
In this Spring web MVC example we are going to have two view pages.
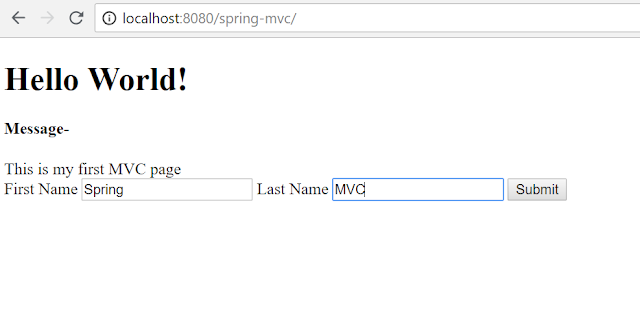
- Landing page (home page) where a message is displayed and there are two text boxes too to enter first name and second name and a submit button. The entered first name and last name are bound to a model bean.
- When the submit button is clicked, controller method which handles request for that click action is invoked and another view page (JSP) is called which displays the entered first name and last name in the first page.
Spring MVC Controller class
package org.netjs.controller;
import org.netjs.model.User;
import org.springframework.stereotype.Controller;
import org.springframework.ui.Model;
import org.springframework.web.bind.annotation.ModelAttribute;
import org.springframework.web.bind.annotation.RequestMapping;
import org.springframework.web.bind.annotation.RequestMethod;

@Controller
public class MessageController {
 @RequestMapping(value = "/", method = RequestMethod.GET)
 public String showHome(Model model) {
  model.addAttribute(new User());
  model.addAttribute("message", "This is my first MVC page");
  return "home";
 }

 @RequestMapping(value = "/showUser", method = RequestMethod.POST)
 public String showUser(@ModelAttribute("user") User user, Model model) {
  model.addAttribute("firstName", user.getFirstName());
  model.addAttribute("lastName", user.getLastName());
  return "user";
 }
}
As you can see the class is annotated with @Controller annotation which indicates it is a controller class and should be registered by the <context:component-scan> tag. Also there are two methods, first method showHome handles the request where path is “/”. Second controller method showUser serves the request where path is "/showUser". Mapping the paths to these controller methods is done using @RequestMapping annotation.
Model bean
public class User {
 private String firstName;
 private String lastName;
 public String getFirstName() {
  return firstName;
 }
 public void setFirstName(String firstName) {
  this.firstName = firstName;
 }
 public String getLastName() {
  return lastName;
 }
 public void setLastName(String lastName) {
  this.lastName = lastName;
 }
}
Spring Web MVC view pages
As you can see from controller methods, logical view names that are returned are “home” and “user” which means there should be two JSPs home.jsp and user.jsp inside folder /WEB-INF/jsp.
home.jsp
<%@ page language="java" contentType="text/html; charset=ISO-8859-1"
    pageEncoding="ISO-8859-1"%>
<%@ taglib prefix="form" uri="http://www.springframework.org/tags/form"%>
<!DOCTYPE html>
<html>
<head>
<meta charset="ISO-8859-1">
<title>Spring MVC tutorial - Home JSP</title>
</head>
<body>
  <h1>Hello World!</h1>
  <h4>Message- </h4><span>${message}</span>
  <form:form action="showUser" modelAttribute="user" method="post">
    <tr>
      <td>
        <form:label path="firstName">First Name</form:label>
      </td>
      <td>
        <form:input path="firstName" id="firstname" />
      </td>
    </tr>
    <tr>
      <td>
        <form:label path="lastName">Last Name</form:label>
      </td>
      <td>
        <form:input path="lastName" id="lastname" />
      </td>
    </tr>
    <input type="submit" value="Submit">
  </form:form>
</body>
</html>
In the controller method showHome() a message is set as attribute, which is displayed in this JSP. Method also sets an instance of User which is used to bind the properties of the bean to input values. Attribute path is used to set the values of the correct fields.
user.jsp
<%@ page language="java" contentType="text/html; charset=ISO-8859-1"
    pageEncoding="ISO-8859-1"%>
<!DOCTYPE html>
<html>
<head>
<meta charset="ISO-8859-1">
<title>Spring MVC tutorial - User</title>
</head>
<body>
    <h4>First Name</h4><span>${firstName}</span>
    <h4>Last Name</h4><span>${lastName}</span>
</body>
</html>
In this JSP, attributes set in the model using the instance of the user is used to display those field values.
Building war for the Spring MVC application
All the Spring MVC configuration is in place, classes are written now is the time to package your web application as a war.
Right click on project, select Maven build, in the opened window enter Goals as clean install and run it.
If you get “Build Sucess” on your console that means war is successfully built, otherwise check the error.
Running Spring Web MVC application using Tomcat
You can add Tomcat server to Eclipse IDE and run it from there itself, it is more convenient.
- Refer Adding Tomcat Server to Eclipse to see how to add Tomcat server to Eclipse IDE.
Since you selected target runtime as Tomcat Server for this Spring MVC example application in the beginning itself, right clicking on the server and selecting “Add and Remove” you should see the application on the left hand side. You can select it and move it to right side so that it is configured to run on TomCat Server.
Start the server, your configured application will also be deployed to the server. Once the Tomcat server is successfully started you can run your Spring Web MVC application.
To go to the home page, enter this URL- http://localhost:8080/spring-mvc/ in the browser. Change the port and application name as per your configuration.
Enter first name and last name, click submit. Using the mapping and the logical view name, application should open second view (user.jsp).
That's all for this topic Spring MVC XML Configuration Example With Annotations. If you have any doubt or any suggestions to make please drop a comment. Thanks!
>>>Return to Spring Tutorial Page
Related Topics
You may also like-


Hi, I followed the steps as directed but I get this error when I run the program
ReplyDelete" HTTP Status 404 – Not Found
Type Status Report
Description The origin server did not find a current representation for the target resource or is not willing to disclose that one exists.
Apache Tomcat/10.0.13 "
What am I doing wrong?
It is hard to find out what is wrong with out seeing the code. Web server is not able to find the requested resource, will you please double check the URL pattern, request mappings and the return string which resolves to JSP.
Delete